December 19, 2012

Fantasy Shadow Box by Tina Connolly

The very talented TINA CONNOLLY is with us today.  Check what she has done with our TWIDDLEYBITZ FSBS004  Fantasy Shadow Box.
It's amazing!

Tina shares her techniques for recreating: 

Box sides

       Start by constructing the base and sides of your Shadow Box, using a strong glue.  Allow to dry.
       Spray with your favourite mists.  Allow to dry. 
       Ink up a script stamp with Stazon ink, and stamp the outside of the box randomly. 
 Crop and adhere your photograph in the centre of the box.

Decorative frame (front of box)

       Spray both sides of the decorative frame using two or three colours of mists. 
 Allow to dry.
       On the front of the decorative frame, apply Gel Medium over a decorative stencil/mask.  
Allow to dry until tacky, then dust Perfect Pearls over it using a soft brush.   
The Perfect Pearls will adhere to the Gel Medium . 
 Allow to dry completely. 

       Rub the edges of the box and frame with Viva Décor Inka Gold.


Embellishing with FRA003 FANCY FRAME

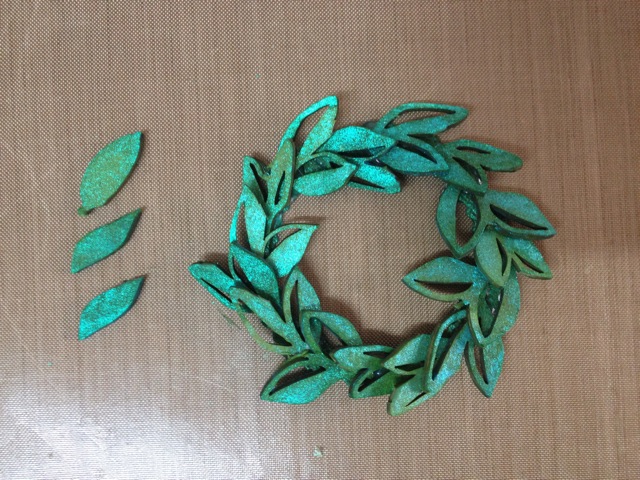
       Cut the Twiddleybitz Fancy Frame as shown in the photograph:
  

I have included another photo to show how I arranged my chipboard pieces.


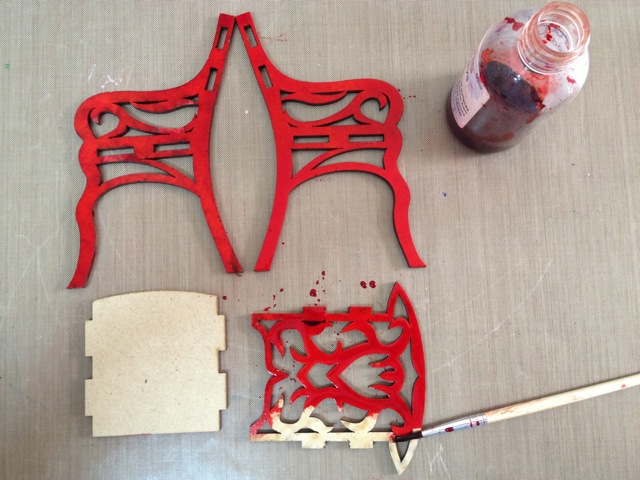
       Paint these pieces, allow to dry then ink with Versamark. Sprinkle embossing powder, I used Lindy’s Stamp Gang Sunrise Salmon Gold on the outer edges of some of the pieces and  another embossing powder; I used LSG Morning Glory Azure, to the remainder.  Melt embossing powder with a heat gun. 

Finishing Your Piece:

.       Adhere decorative frame to the shadow box, attach embossed pieces (cut from the Vintage Frame) as shown. 

   Attach metal charms or other embellishments using a strong glue such as Helmar 450 Quick Dry Adhesive.  I used a leaf charm and some wings from a broken necklace.  (To add colour to my leaf charm, I sprayed with a mist and when dry, sealed it with Dimensional Magic.)


December 16, 2012

Wreath 'Joy'


Today we have the very talented JENNIFER HODGE with us.  Jen shares her process for recreating this gorgeous wreath that adorns the front of her card.


I had so much fun making this card and it all started with a few branches!!


Instructions:

First I sprayed the leaves both sides with green sparkly spray:

 Then I cut a wreath using two circle cutters through my Big Shot machine.  

 I cut the leaves so they were separate parts and gave them another spray to really sparkle:

Once dry, I laid the leaves out and began attaching them to the wreath:

 I had a few spare:

 Then I added some self adhesive pearls for berries:

 And a bow at the top (that I later changed to white):

Materials:

TWIDDLEYBITZ PRODUCTS:


Twiddleybitz - Alpha Square (ALP004)
Twiddleybitz - Fern Leaves Set of 4 (FER001)

OTHER PRODUCTS:

Cardstock - red
Cardstock - white embossed
Red Green and White striped Ribbon
Green Tara - White pre-tied bow
Flourish With A Bling - Adhesive Pearls - Red
Lindy's Starburst Stain - Green Goblin
Adhesives by Stix2Anything


Thanks for stopping by.
 I hope to see you creating wreaths of your own - let me know when you do!!

Jen

December 3, 2012

Oh Christmas Tree Card by Charlene Camilleri


Hi Twiddley Fans,

DT Member CHARLENE CAMILLERI has created this fabulous Christmas card and shares the process for recreating it.
Thank you Charlene!   

Oh Christmas Tree Card


Twiddleybitz Product
FLOR020 Flourish Pack for Cards
BUT006 Butterfly
Twiddley Template Snowflake

Other Product
1 piece of 12 x12 inch White Cardstock
Dew Drop Brilliance Galaxy Gold
Kindy Glitz Dusty Rose
Ranger Dylusions Fresh Lime Ink Spray
Lindys Stamp Gang Bougainvillea Fuchsia
Rhinestones

Step 1 
Separate the swirls from the pack, you will need 2 large scrolls and 3 medium scrolls. Spray with the Dylusions Fresh Lime Spray then use a heat gun to dry.
 Step 2
Spray a butterfly with the Fuchsia Spray and dry.
Step 3
You need to trim 3 pieces from your cardstock. One piece will be the actual card which will measure 24 x 16 cm. Fold in half. The second piece will be your snowflake piece which measures 11.5 x 15.5 and the third piece will be for your Christmas Tree, this measures 12.5 x 6.5 cm.

Step 4
Lightly spray your snowflake piece with the Fuchsia spray. Heat gun dry- the paper will bend up whilst drying, this is fine as it will flatten again.

Step 5 
Position your snowflake template over the sprayed card and randomly spray over with the fresh lime spray. Carefully lift the template off. Heat gun dry then adhere to the front of your card.
Step 6 
Use the Dew Drop Brilliance Gold to colour the edge of the card. Use foam tape and adhere to the right of the card.
 Step 7 
Cut 2 of the medium swirls as shown.Use glossy accents to adhere these and the butterfly to the white card. ( Fold the wings up to create a 3D looking butterfly ). Embellish with rhinestones. Glitz the butterfly wings with the kindy glitz.


November 29, 2012

Santa's Chair by Jennifer Hodge

Hi Twiddley Fans,

Jennifer Hodge is with you today.

I think these chairs from Twiddleybitz are super cute and have loved all the soft feminine chairs that people have created with them but I wanted to do something a bit different!  Christmas gave me the perfect opportunity to make Santa's Chair!!

I started by painting the poppy colourspray onto the MDF - spraying doesn't work so well as it beads on the wood.
Then I glued all the pieces together with pva - this was super easy as they slot together perfectly!
Embellishing the chair was again extremely easy as I used a Christmas embellishment pack from my2angels.net!  I didn't have to make any pins, rosettes, tags or do any embossing!!
Here's the gorgeous rosette on the front of the backrest and the two 'star cushions'!
I did however sew the pincushion!!! yay me!  dusted off the sewing machine - it's been a while BUT I cheated with the Santa Sack and put cushion stuffing in a pre-made organza bag :-P.  I added the green sparkly ribbon from the pack and the gorgeous charming chain too.
And a side view too :-)

Products:
Twiddleybitz - MDF Chairs, 2pk (MDF02)
My2Angels - Christmas Embellishment Kit (Brisbane Show Purchase)
My2Angels - Charming Pins 
My2Angels - Felt Shapes
Colorful Thoughts Sprays - Poppy
Tattered Angels - Glimmer Mist, Scarlet
Red Material
Red Organza Bag
Cushion stuffing
PVA Glue

Stay tuned for my next Christmas Twiddleybitz Off the Page Project!  It's so exciting!!


November 26, 2012

Easy Leaf Tutorial with Janice Nicholls


Hi Twiddley Fans,

DT Member JANICE NICHOLLS has a fabulous way of altering our chipboard leaves.


Janice shares her creative process:


Step 1
    Ink chipboard, you may need to do this a few times to get the colour your need or prime your piece of chipboard with gesso first.

Step 2
    Use a stitch marker and roll it through the centre of each leaf

Step 3
    Using a zig pen or a fine black pen to outline the edge of each leaf.

Step 4
    Attach to layout, add pop up dots to give the leaves some dimension.


November 22, 2012

Country Style Mailbox with Rachel Walsh

Hi Twiddley Fans,
Today DT Member RACHEL WALSH shares the creative process for recreating a country style mailbox.

Country Style Mailbox

Created by Rachel Walsh for Twiddleybitz

Materials:
Twiddleybitz:
Mailbox
Twiddley Groove Alpha (ALPHA001)
Vine 
Butterfly BUT006
Rusting Powder TWBTZRUST

Other materials:
Corrugated A4 card
Scrap of plain card
Basic Grey patterned paper
Paint – grey (or mix white with a tiny bit of black)
Black Gesso
Glimmermist
Tim Holtz Distress Stain – Rusty Hinge
Flowers
Florist tape & wire
Bird
Vinegar
Glue – Helmars 450
Embossing powders
Heat Gun
  
Step 1 (Optional): 
Cover or paint the inside of the walls, base & flap of the mailbox.  
Step 2: 
Cover the sides, ends & flap with corrugated board (I bought A4 sheets as it is thinner & more flexible than an old box – and less messy – but you can recycle a box if you prefer).  Paint or mist the bottom of the base piece, and the three pieces that hold the flap in place. 
Step 3:  
Using a strong glue, attach the flap pieces, making sure you insert the flap through the holes before gluing the last piece in place. Glue the four sides together, and attach to base piece.  Use lackey bands to hold it together while it dries.
Step 4: 
Gently bend the roof along the score lines (a light mist of water can assist).  Using strong glue, attach to the box and use lackey bands to hold it while it dries. 


Step 5:  
Cover the roof with corrugated card, trimming to fit after you have secured it.  Neaten any rough edges with sandpaper.

Step 6:
  Cut ¾” strips of card, score along the centre, and attach to the corners of the box to neaten the joins.  

Step 7:  
Roughly paint the assembled mailbox with grey paint and leave to dry.  Paint the stand with a thick layer of black gesso & use a heat gun to dry – the paint should bubble & create lots of texture.


Step 8:  
Using Tim Holtz “Rusty Hinge” Distress Stain, liberally apply it over the painted mailbox to give an aged “rusty” look.  Apply glue to random parts of the mail box and the stand and sprinkle with Twiddleybitz Rusting Powder.  Leave to dry.  Spray the rust with vinegar to start the rusting process.


Step 9: 
Glue the stand together and attach to the base of the mailbox.  Decorate the mailbox as desired.  I’ve used a leafy flourish that I’ve painted green & sprayed with Glimmermist, to which I’ve added a flower vine (I’ve wired together individual flowers, with the aid of florist tape & wire).  To age the Twiddley Alphas, I’ve embossed them with thick gold embossing powder and kept the heat on them at close range until they started to “burn”.  The butterfly has been embossed with a couple of different colours of embossing powder.

Add embellishments and you are done!